


TMProxy offers multiple ways to use proxies — from a desktop application, a browser extension, and manual WiFi configuration on mobile, to integration with anti-detect software and a full automation API. This guide walks you through each method in detail, including proxy formats and tips for rotating or holding your IP.
How to Use TMProxy: A 5-Step Overview
High-Speed Proxy - Ready to Try?
ALGO Proxy offers residential, datacenter & 4G proxies in 195+ countries
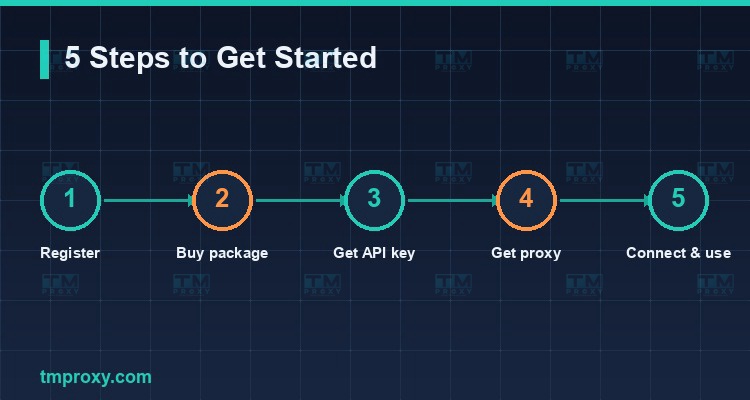
No matter which method you choose, the overall workflow always comes down to 5 steps:
- Register an account at tmproxy.com.
- Purchase a plan that fits your use case (Account Nurturing, IP Rotation, or VIP Fast Rotation).
- Get your API key from the account dashboard.
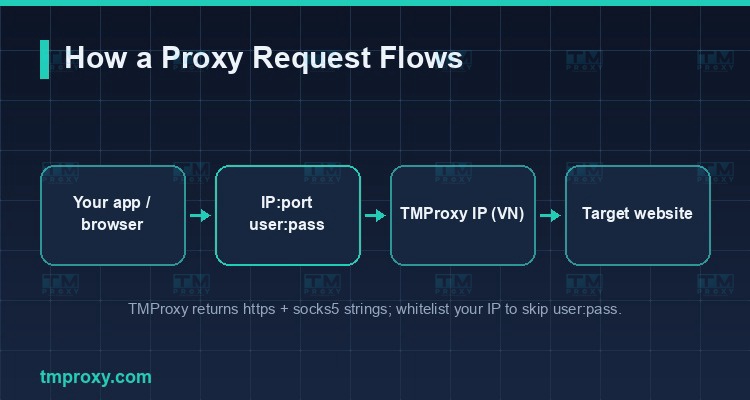
- Fetch a proxy — you will receive an
IP:port:user:passset along withhttpsandsocks5connection strings. - Connect the proxy to your browser, phone, anti-detect software, or call it through the API.
The sections below dive into each step and each method in full detail.
Steps 1–3: Register, Purchase a Plan, and Get Your API Key
First, set up your account and plan:
- Register an account: Go to tmproxy.com, sign up with your email or phone number, and top up your balance.
- Choose and purchase a plan: Consider your needs — pick a stable-IP plan for account nurturing; choose a VIP plan for scraping and fast IP rotation. You can start with an affordable plan (from as little as 5.000đ/day) to test the service.
- Get your API key: In the dashboard, every account has its own API key. This is the "key" used to fetch proxies and call the API — keep it secret and never share it publicly.
Step 4: Understanding Proxy Formats and Fetching Your Proxy
When you fetch a proxy, TMProxy returns a set of fields:
- public_ip — the public IP address of the proxy.
- https — the connection string for the HTTP/HTTPS protocol (in
ip:portformat). - socks5 — the connection string for the SOCKS5 protocol (in
ip:portformat). - username / password — the proxy authentication credentials.
- isp_name / location_name — the ISP and region of the IP.
- timeout — the proxy session lifetime (0 means unlimited, governed by your plan).
- next_request — the minimum remaining time before you can rotate to a new IP.
Most software expects the proxy in IP:Port:Username:Password format. Choose the protocol (HTTP or SOCKS5) based on your tool — SOCKS5 is generally more stable for applications and games.
Five Ways to Connect: Manager, Extension, Mobile, Anti-Detect, API
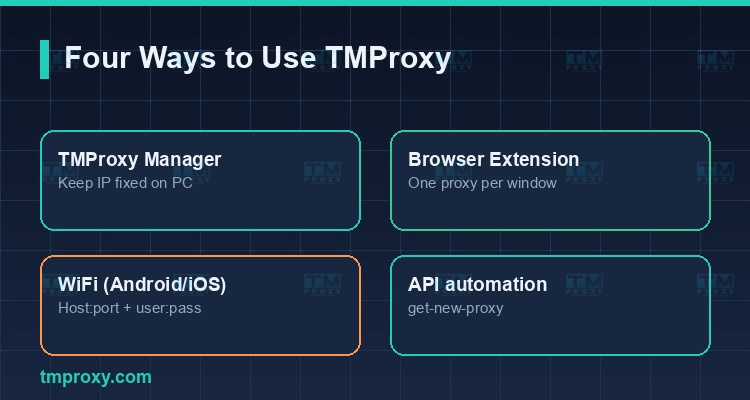
TMProxy provides dedicated supporting software so you can use proxies conveniently on any platform. Here is each method in detail.
TMProxy Manager (Hold a Fixed IP on PC)
TMProxy Manager is a Windows application designed to keep your IP fixed and automatically rotate the IP when your plan's session time expires. How to use it:
- Download TMProxy Manager from the official documentation page and extract it.
- Open the application and log in with your API key.
- The application opens a local proxy port on your machine — for example
127.0.0.1:port. - Point your browser or application to that local port. Manager will forward all traffic through the TMProxy proxy and keep the IP stable throughout the session.
This is the best choice when you need an IP that stays fixed for long-running tasks.
TMProxy Extension (One Proxy per Browser Window)
The TMProxy browser extension lets you assign a separate proxy to each individual browser window — extremely useful when managing multiple accounts on the same machine. How to use it:
- Install the extension from the Chrome Web Store or Firefox Add-ons (search for "TM Proxy").
- Open the extension, enter your proxy details or log in.
- Assign a proxy to each window or profile — every window exits to the internet through a different IP.
On Android, Emulators, and iPhone/iPad
On mobile devices, the most common approach is manually configuring the proxy in WiFi settings:
- Android & emulators (LDPlayer, NoxPlayer, etc.): Open the settings for your connected WiFi network → modify network → set Proxy to "Manual" → enter the Host (proxy IP), Port, and if required, username and password.
- iPhone/iPad (iOS): Go to Settings → Wi-Fi → tap (i) next to your connected network → Configure Proxy → Manual → enter the Server, Port, enable authentication, and enter the username and password if needed.
Tip: on mobile, consider using IP whitelisting (ip_allow) or choosing the appropriate protocol for a more stable connection.
Anti-Detect Software (AdsPower, Hidemium, GenLogin, MoreLogin, BitBrowser)
This is the most popular method among MMO marketers for running multiple accounts. The general process is the same across all anti-detect applications:
- Fetch your proxy from TMProxy: IP, Port, Username, Password and select the HTTP or SOCKS5 protocol.
- In the anti-detect software, create a new profile → navigate to the Proxy section.
- Select the proxy type (HTTP/SOCKS5), and fill in the Host (IP), Port, Account, and Password.
- Click Check Proxy to confirm the IP and location, then save the profile.
TMProxy has dedicated guides for each application (AdsPower, Hidemium, FoxyProxy, GenLogin, MoreLogin, BitBrowser) available in the official documentation.
Using the API for Automation
For those who need full automation, TMProxy provides a straightforward API. The two most important endpoints are:
- get-new-proxy — fetch a new proxy (rotate IP). Send a
POSTrequest tohttps://tmproxy.com/api/proxy/get-new-proxywith a JSON body containingapi_key,id_location, andid_isp. - get-current-proxy — retrieve your current proxy without rotating. Send a
POSTrequest tohttps://tmproxy.com/api/proxy/get-current-proxywith yourapi_key.
Example — fetching a new proxy with cURL:
curl -X POST https://tmproxy.com/api/proxy/get-new-proxy \
  -H "Content-Type: application/json" \
  -d '{"api_key":"API_KEY_CUA_BAN","id_location":0,"id_isp":0}'
The response returns https, socks5, username, password, timeout, next_request, and more — ready to be fed directly into your tool. Other available endpoints include location (list of regions), isp (list of ISPs), note, and stats.
How to Rotate and Hold Your IP
This is the most important section for using proxies correctly:
- Rotate IP: Call
get-new-proxy, or click the rotate button in the dashboard or Manager. Watch the next_request field — if the cooldown has not elapsed, the system will return the current IP instead of a new one. - Hold IP (sticky): Use TMProxy Manager or a sticky-IP plan to keep a fixed IP for your entire working session. Ideal for account nurturing.
- Scheduled rotation: TMProxy supports automatic IP rotation at set intervals — perfect for scraping workflows that need regular IP cycling.
The golden rule: rotate IPs for crawling; hold IPs for account nurturing.
Troubleshooting Common Issues
When a proxy is not working, check in the following order (per TMProxy's official guidelines):
- Verify your API key (token) is still valid.
- Check your IP whitelist — if you are using ip_allow, make sure you have declared your machine's current public IP correctly.
- Confirm the correct protocol — using HTTP while configured for SOCKS5 (or vice versa) will prevent the connection from working.
- Ensure your plan has not expired.
- Disable IPv6 / add an exclusion for the application if it is being blocked by a firewall or Windows Security.
- Contact support if the issue persists — TMProxy provides 24/7 technical support.
Conclusion: Using TMProxy is highly flexible: run TMProxy Manager to hold a fixed IP, use the Extension to assign a different proxy to each browser window, configure WiFi settings on mobile, integrate with anti-detect software for MMO workflows, or call the API for full automation. Once you understand the proxy format and the mechanics of rotating versus holding an IP, you can get the most out of TMProxy's Vietnamese residential proxies.